Apps ain’t cheap. They cost more money, time, and energy than most people have. Thus, if you’re getting started on an app development journey, you want to make every penny and every second count. The last thing you want is for all that money and time to have been spent in vain. Unfortunately, most people set themselves up for disaster. They have an idea for the next big app, spend a bunch of money, then scratch their heads when it isn’t a hit. So what should you do to make sure this never happens to you? Simple: find product-market fit ASAP.
What is Product-Market Fit?
Product-market fit is pretty straightforward. It revolves around a simple principle: build a product for an existing market instead of finding a market after it’s built. In short, the best way to do this is to test your product constantly. Build a bare-bones product, run some tests, and see what works and what doesn’t.
Okay, but how do you actually achieve it? We wrote a post about it back in October, but it’s pretty short. Besides, it’s hard to talk about such a nuanced concept in so little space. It may be easier to start with what not to do.
What Not To Do
Do not under any circumstances go all-in on a product without a market. And not just any market will do. You need a rock-solid market. Your market should be so perfect that your customers can’t shut up about how amazing your product is. If you have achieved true product-market fit, you don’t even need to inject a billion ads into the aether; your customers will sell your product for you.
Here’s the kicker: unless your customers say they need your product and can’t live without it, you don’t have product-market fit yet. That’s okay. You just need to keep looking.
What’s not okay is when a company tries to force product-market fit.
No matter how much you spend on advertising, you will never ever be able to force a market to fit your product. Ads and promos may get you users, but it won’t convert them. Ultimately, it comes down to this: if your app doesn’t fill a need, no one will need it.
Instead of building a product first and finding a market later, why not find a market first and build the product later? Even better, why leave your product stagnant when you can constantly update it to fit the exact needs of a market?
That’s the jist of this blog post. Now, let’s get into building that immortal app.
How to Make an Immortal App
If you took one thing away from this article it would be this: an app isn’t a one-and-done project. It’s a living, breathing organism. As the problem you’re solving changes, your app should change, too. And if your app stops adapting to that ever-changing problem, it will die.
So how do you make your app immortal?
It’s simple: let it evolve.
If you build an app once and never touch it again, it will die. The only way to build a successful app is to change it constantly.
This isn’t just about maintenance, either, because product-market fit isn’t permanent. An app with perfect product-market fit in 2020 will be as out of place in 2025 as an app from 2015 is now. Consider the old McDonald’s app. It took way too long to release and refused to change for ages, so as a result, it was one of the lowest-rated apps on the app store.
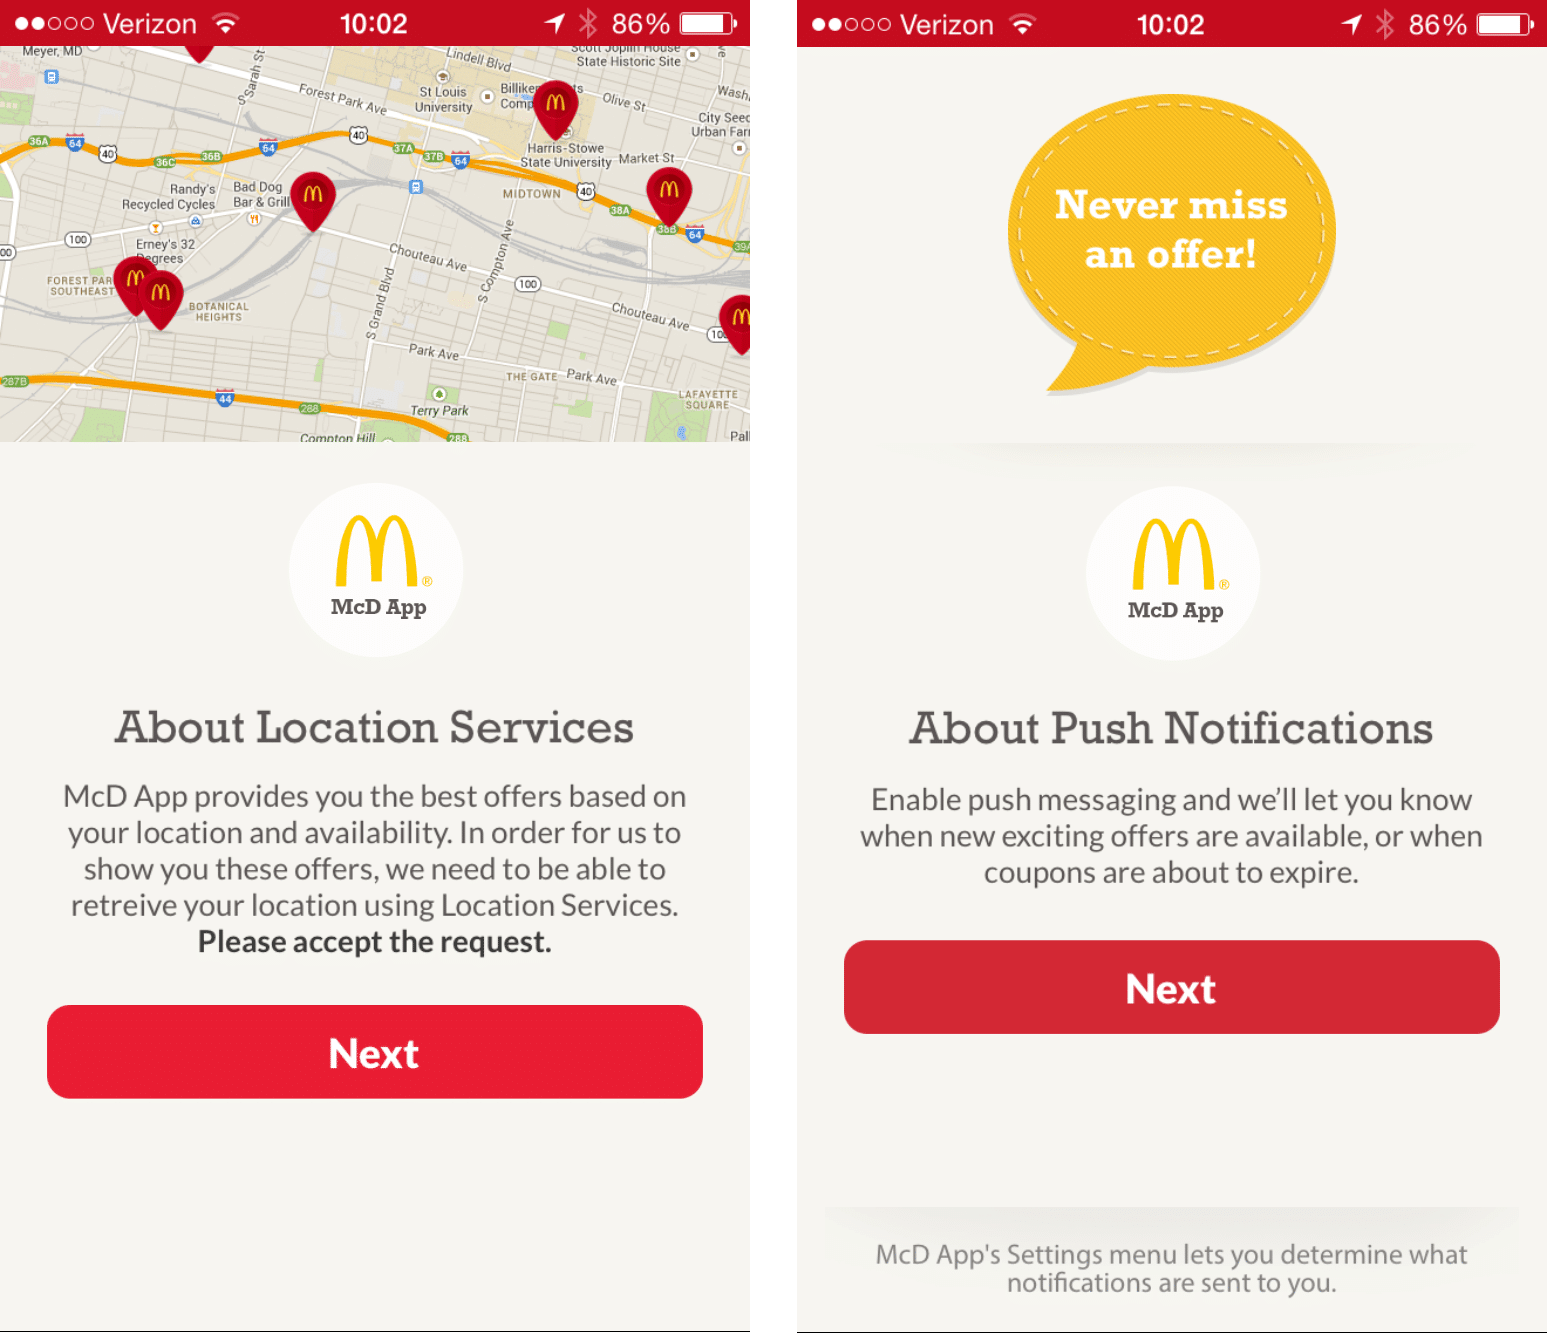
Image from Livecode
So don’t throw it up on the app store and expect installs from now until the end of time–that will never happen. Exactly zero successful apps are exactly the same as they were when they launched.
Your app is a product, and every product on earth changes over time. Research your audience, test what they dislike, and make changes constantly.
Step 1: Find a Problem
I’ll keep this one brief: unless you’re solving a problem you have no product. Your problem doesn’t have to be big, like solving world hunger. It could very easily be a minor nuisance in people’s daily lives. But no matter how big or small the problem is, it needs to exist. If you cannot instantly identify the problem you’re trying to solve, then there won’t be a market.
The following steps are a lot easier to explain with an example–particularly a fun and kind of silly one. Let’s say you’re in charge of a beautiful park with nice hiking trails, rest stops, and a beautiful pond with lots of ducks. However, you recently had to put up a sign asking people not to feed the ducks bread (it’s very bad for them), so all the picnicking couples, elderly bird-watchers, and office workers on their lunch breaks have nothing to feed the ducks and may want to leave. Sure, they could feed the ducks halved grapes instead, but the nearest grape store is miles away. There’s your problem. It’s a small problem, but the market’s ripe for disruption.
Step 2: Form a Hypothesis
When you identify a problem, the first impulse is to brainstorm solutions. Unfortunately, that’s the wrong move. Here’s why.
Brainstorming alone doesn’t result in the best solution. In fact, it may not result in a good solution at all. Sure, you know what the problem is, and you probably know why it’s a problem, but that’s not enough. Your job isn’t to solve the problem because that’s what your users want to do. Your job is to give them what they need–and how can you possibly give them exactly what they need if you just brainstorm in a board room?
Let’s use an example. Remember this scene from Sillicon Valley?
If you try to find a solution to lost parking spaces, you may make a parking-tracking app. But is that really the best tool for the customer? How many people will install your app when they could just write it down in notes? It may solve the problem, but no one will use it.
That’s why you need to start with a hypothesis instead. It’s a testable guess that you can use to figure out exactly what the users need. Heres’ the kicker, though: don’t use your hypothesis to guess what causes the problem. Use your hypothesis to guess how people react to it. That’ll root out products like the parking app.
Secondly, make sure your guess is very well-informed. Don’t turn an observation into a hypothesis. Ask your potential customers about the problem
Let’s see how this works for our duck pond example.
You’ve identified a problem: park-goers can’t feed the ducks bread, but the nearest grape store is miles away. As a result, both the ducks and the park-goers are leaving. If you were to brainstorm, you may end up with some pretty ridiculous solutions. You could put a giant net over the pond so the ducks can’t leave, or you could apply superglue to all the park benches (of course these solutions sound silly; we’re using a silly scenario). But neither one of these silly solutions will work very well.
You could also decide that the best way to get the ducks food is to feed them a special blend of birdseed yourself. Sure, that keeps the ducks from going anywhere, but does it really serve your customers? They want to feed the ducks, and if you don’t hypothesize about what they will do, you’ll miss that crucial point.
Instead, create a hypothesis. Ask yourself, “what will the park-goers do?”
Here’s a decent hypothesis: some of them will feed the ducks bread anyway, some of them will drive all the way to the grape store, and some will just stop feeding the ducks. Your job isn’t to make the ducks or the parkgoers stay. Your job is to make it easier for them to feed the ducks, and the best way to figure out the tools they need is to guess how they react to the problem.
But a guess isn’t enough. Next, you need to put your hypothesis to the test.
Step 3: Build Your MVP
Once you form your hypothesis, you need to try it out. At this point, you should have a pretty solid understanding of how your potential market behaves. You should know how they react to the problem, what their current makeshift solutions may be, and how they behave, what they like, and what makes them tick. Understanding your audience is critical, and unless you know your potential market like the back of your hand, you will not find good product-market fit.
However, once you’re fairly confident in your hypothesis, it’s time to build your minimum viable product, or MVP. Think of it like a prototype. You build it as quickly as possible with only the core features. If you don’t need it, don’t add it. Your goal is to get a prototype MVP out the door and in front of your ideal customer as quickly as possible. If you spend two years adding features that you don’t absolutely need, someone else will make the product before you.
People love to use cars as an example. In the time it takes to build a car from scratch, you could have built a bike and gotten to market quicker. Crisp’s Blog uses this image to demonstrate their point.
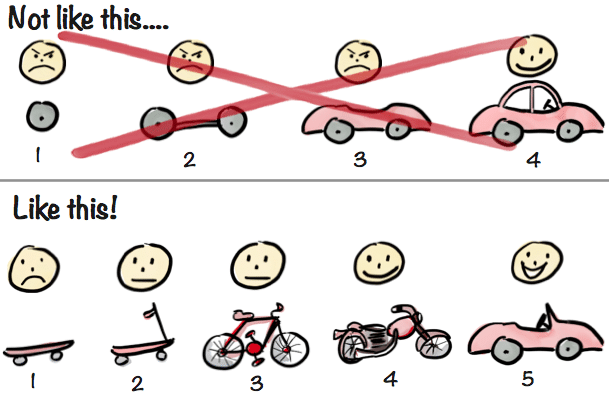
However, this is the wrong philosophy because a skateboard isn’t the same product. In reality, this example from Educati is much better.
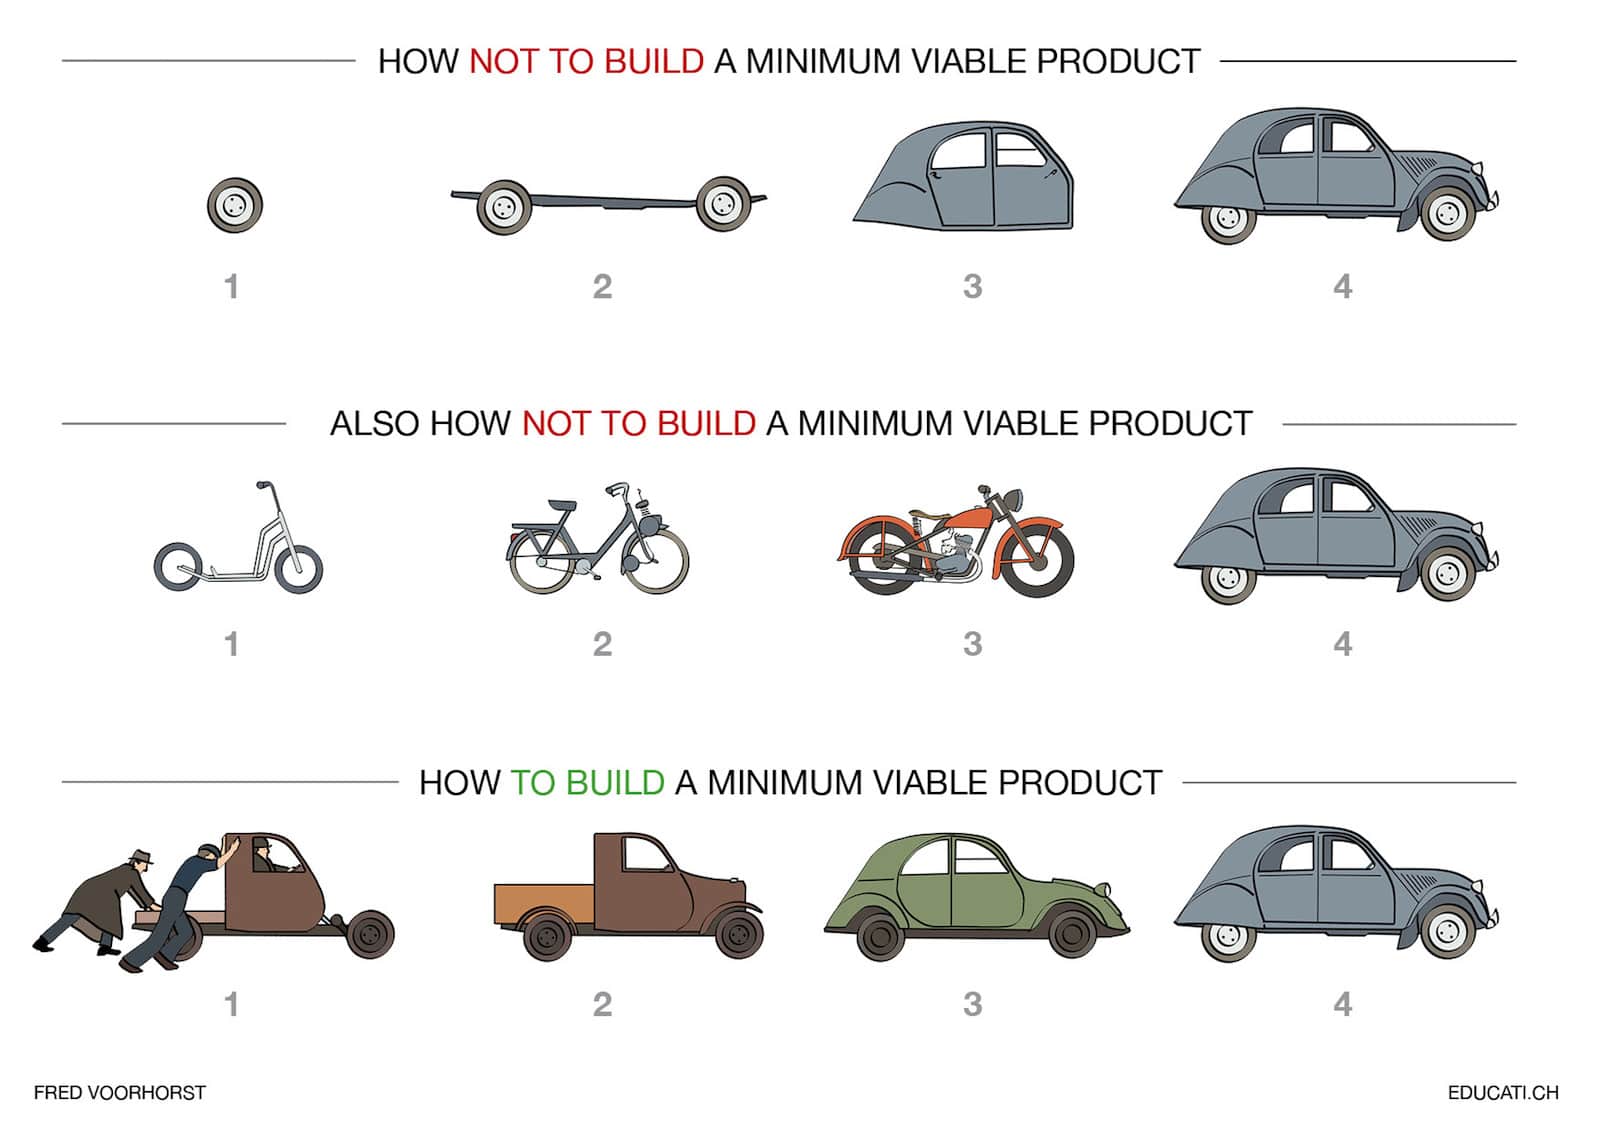
The MVP in this image is still a car, but it’s a very bad bare-bones one. However, after testing, they add a truck bed and a motor. They realized that those were the features customers needed the most, so they added them. Each step isn’t making a new product; it’s tweaking the old one and refining it.
Let’s see this process in action with the duck pond example.
Your hypothesis is that parkgoers will react negatively to the absence of good duck food. They still want to feed the ducks, though. Maybe a good solution would be a duck food service that delivers halved grapes right to your doorstep.
Once you start brainstorming your post-hypothesis solution, you need to put it in front of park-goers ASAP. That means you need a rudimentary app with only the most basic features (if you want to do more testing or focus groups beforehand, that’s even better). Some features, like the grape e-commerce store, are non-negotiable. The stripped-down app cannot function without it. But other features, like the chat functionality that lets you talk to other duck-feeders, aren’t as important. Plus, how do you know people will even use that feature? For now, you are only testing the core concept.
Because that’s what your MVP is. It’s a prototype that you hand over to your customers. It will not be perfect. It may not even be great, but it’s a starting point. Once you see what people like and don’t like about the app, you can start making it even better.
Remember: your MVP is only the bare minimum you need to make it work. Build the rest of the app off of user suggestions. But to figure out what those user opinions are, run some tests.
Step 4: Test
The testing phase is absolutely the most important phase of your application. If you don’t run tests, your MVP basically doesn’t even count. Sure, it’s a minimum viable product, but it won’t fit your audience preferences. The only way to maintain fit is to constantly test what your audience likes and dislikes about your product. And how do you do that? With analytics, of course.
Finding the right tool
It’s pretty hard to go wrong with analytics tools–as long as you use them correctly. Some popular ones include
- Google Analytics: A killer analytics tool for eCommerce websites (or any website for that matter)
- Mixpanel: An event-based analytics tool with lots of nifty features (one of our favorites for mobile apps)
- Amplitude: A pretty similar system that focuses more on cross-device behavior analysis
While we use many analytics tools (Google Analytics, for instance, is stellar for websites), Mixpanel is one of our favorites for mobile applications. Mobile apps benefit from event-based analytics, which means that any time something important happens, the software takes note. Sure, Google Analytics has “Events Flow” under the behavior tab, but it’s optimized for e-commerce sites. This view doesn’t instinctively tell you much without diving in a bit deeper and clicking around.
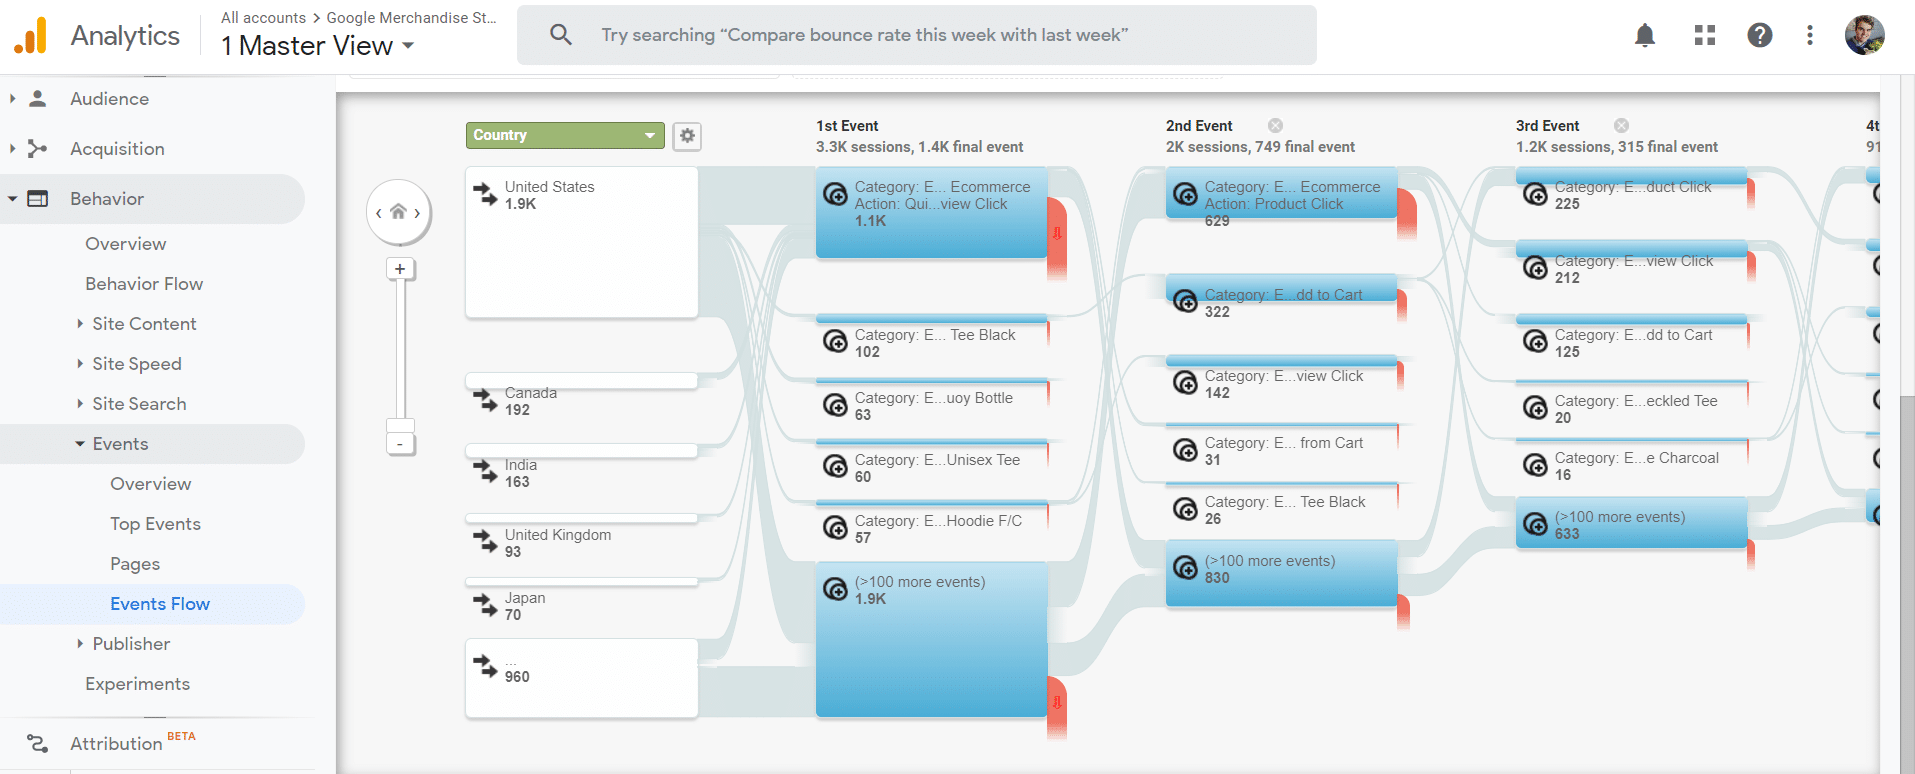
It can do all of the important legwork for you, but at its core, Google Analytics is for websites.
Mixpanel, on the other hand, is built around applications, which makes it a great tool for finding product-market fit. Let’s look at Mixpanel flows to see the difference.
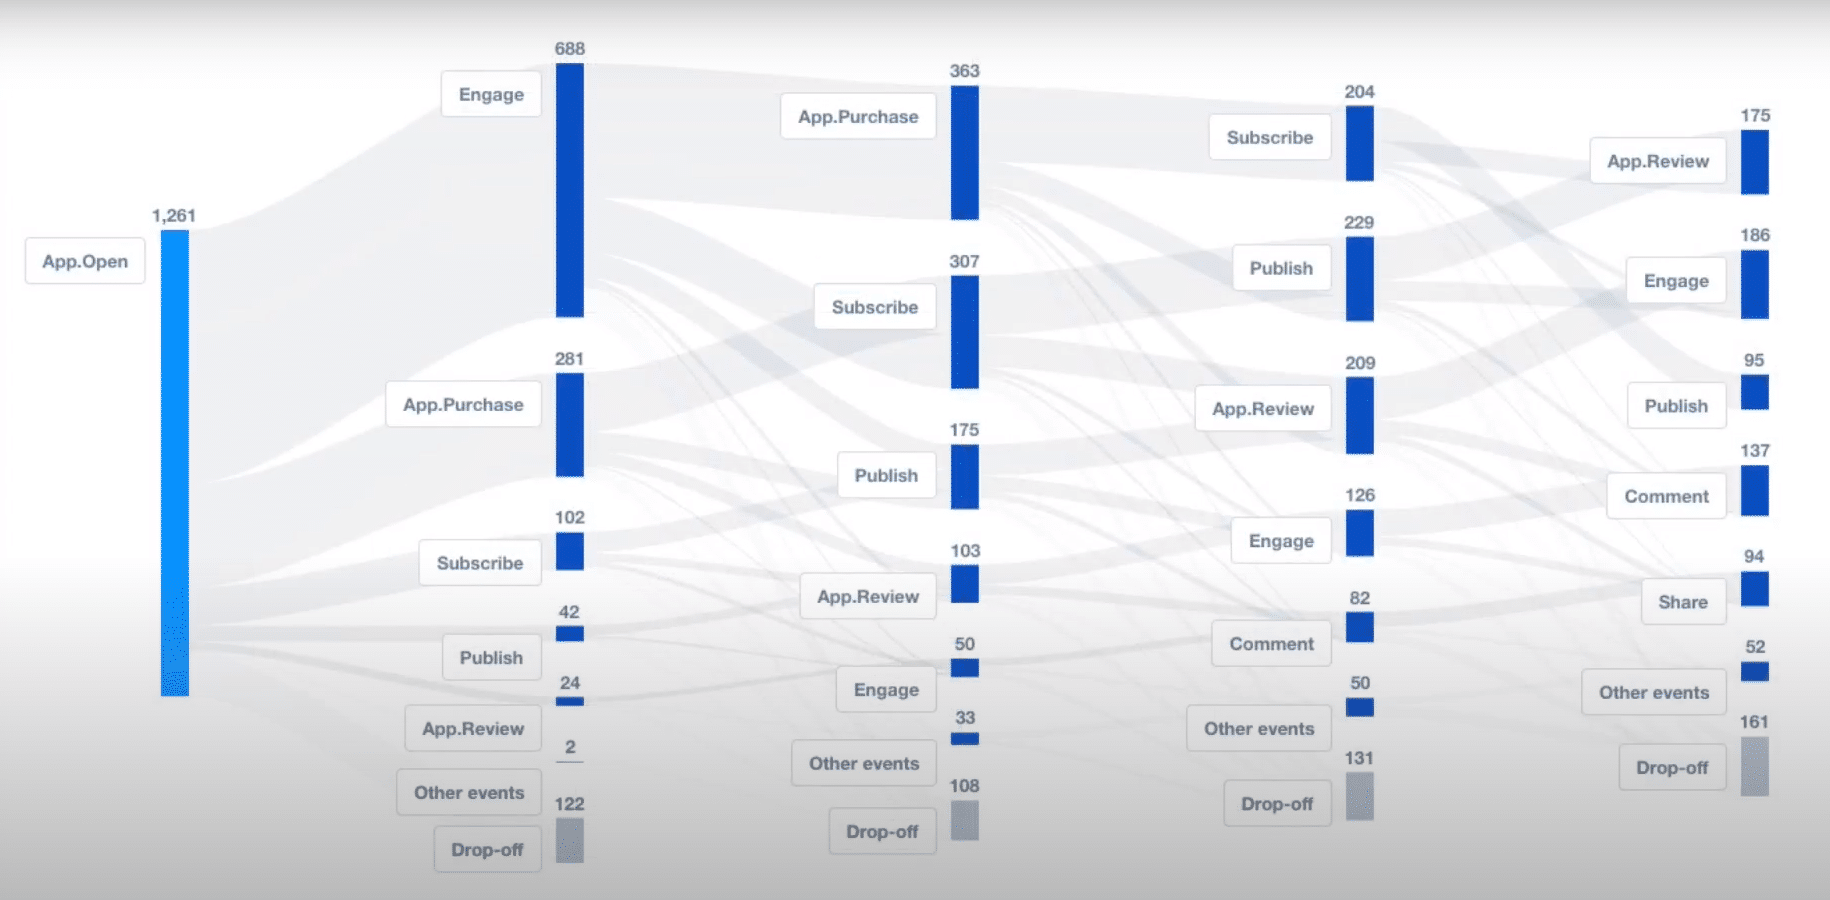
The flow itself is pretty similar, but with a much clearer UI. Plus, all the other flow tools you need are right there on the same page.
But flow isn’t the only thing that makes Mixpanel so great. Mixpanel’s funnel features are wonderful, too, and provide lots of valuable insight into user behavior. Once you set filters and events, you can track funnel events with a straightforward bar graph. Plus, you can see funnel completion over time by just scrolling down a bit.

Again, Google Analytics has many similar features, but they’re organized in a way that’s more useful for eCommerce websites. Mixpanel is organized in a way that’s more useful for apps.
Mixpanel has a few advantages over other analytics platforms, too. Its predict feature is wonderful for figuring out what little push you need to boost conversions. But more importantly, Mixpanel is killer for market automation. You can trigger A/B tests to run after certain events, plus, Mixpanel provides built-in notifications and seamless integrations. These features and more make Mixpanel the optimal analytics suite for analyzing your MVP.
However, a good platform is worthless if you don’t use it. What’s next? How do you make this data useful?
So you’ve added Mixpanel. Now what?
Now that you’ve installed Mixpanel (or another analytics platform–whatever works for your team), you can launch your app. Yippee!
And once your app is launched, you can use your analytics platform to peer into the world of the users. Depending on what you choose, you can view user profiles, behavior flows, or any other KPIs that floats your boat. Depending on your app, you’ll want to view different statistics. That’s not up to a blog post. That’s up to your development team, your product manager, and your marketing team.
However, we can offer one suggestion: look for problems, not solutions.
If you look to your users for solutions, you’ll end up with a Homer Car of a project: one so muddled with impractical features that only sound good to a focus group.

In Season 2 Episode 15 of The Simpsons, a car company takes a little too much feedback from Homer and makes a disaster car
Instead, look to your users for problems. use analytics to check what stops your users from converting or completing certain actions–that’s why funnels are so killer.
Let’s look at a Mixpanel funnel graph:
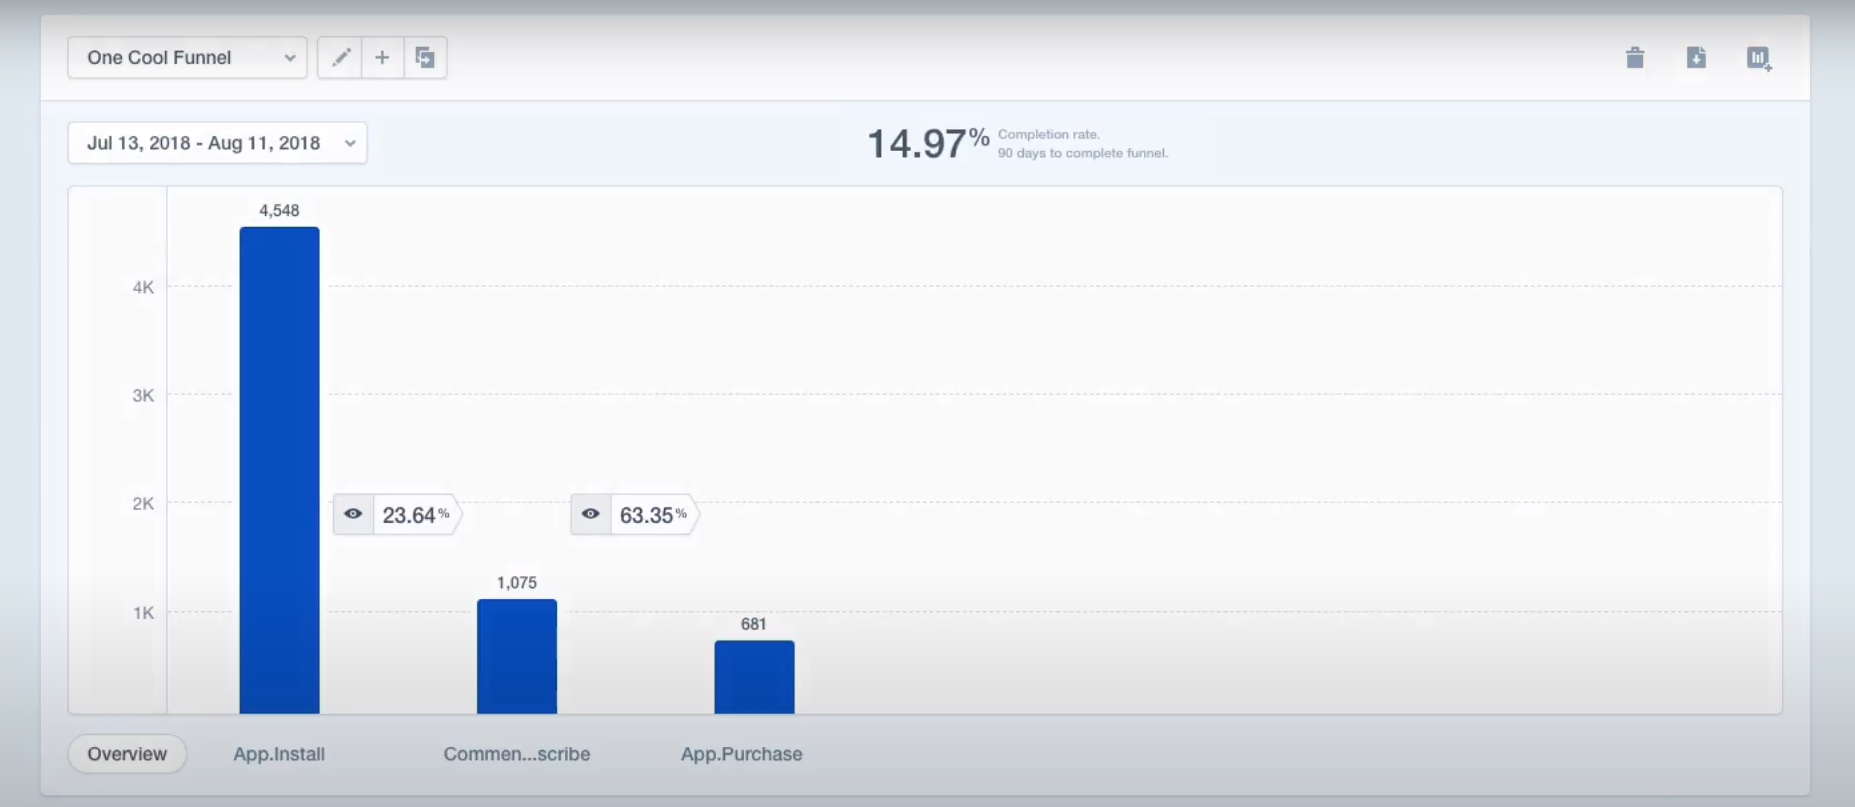
Each bar is an event. About a quarter of the users that install the app will comment and subscribe. however, about 2/3 will complete a purchase after that. After you see this funnel, consider the roadblocks preventing people from moving to the next step. For that, you can turn to the flows. or, if you want to dive deeper into the data, 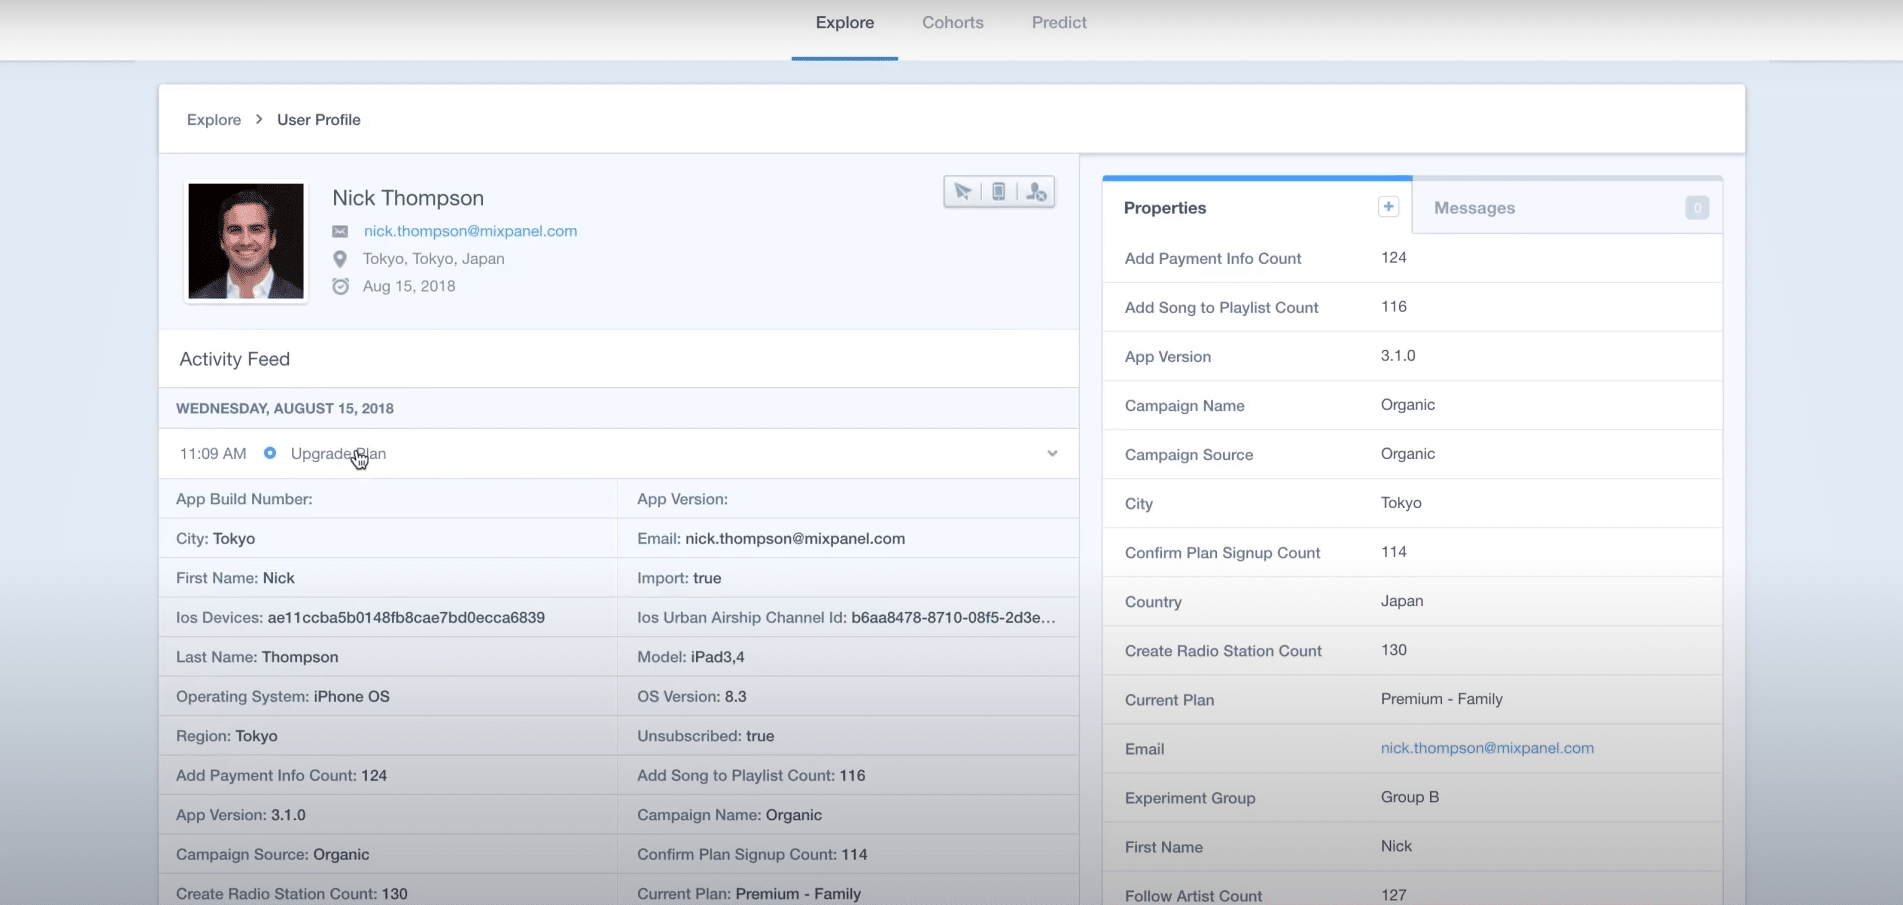
This lets you form a good idea of what each individual person goes through when using your app. That way, you can figure out major underlying problems and fix the app to build a better user experience.
What do you do when you find problems?
Once you get a good idea of what the users dislike, start trying to find the smallest, simplest solutions. Then, test those solutions with your audience. Repeat this process indefinitely throughout the growth phase.
Let’s, once more, look at the duck pond example. Maybe when you start running tests, you realize that customers don’t find it very convenient to ship grapes to their doorsteps. At that point, they could just use Amazon. Instead, it would be more convenient to ship the grapes right to their park bench.
But a more likely scenario is that through A/B testing, you’d discover that a certain page, button, or feature is getting in the way of conversion. You make a change, compare the results, and keep the one that works best. If you do that constantly, your app can only improve.
Step 5: Grow
While the testing phase tells you what your users like and dislike, the growth phase allows you to take action. It’s where you start prototyping solutions, testing them with your audience, and seeing the results. In short, growth is all about slowly changing your solution (the app) to fit the exact problem (whatever issue you identified at the beginning).
As you learn more about your users, you should be able to pin down an “Aha!” moment. That’s when the user gets some value out of the app that makes downloading it worth it. If you build it right, they’ll keep coming back for that “Aha!” moment. For a hamburger, the “Aha!” is when you take a bite. For the duck pond app, the “Aha” is when the user gets the grapes delivered to their park bench and can feed the ducks. For Twitter, it’s seeing a really good tweet. Every app is different, but you need to find your “Aha!” to continue.
Once you’ve identified the “Aha!” moment and problems, you can start refining. Remove all the obstacles in the way of that moment. Solve the problems. Constantly test these solutions with your users to see if they work or if they fail.
But remember: the key to growth isn’t solving every single problem in one fell swoop.
The key to growth is solving each problem one step at a time.
Growth is all about iteration. Run as many small experiments as you can as fast as possible. Think a different button will help? Test it! Think a new page is wise? Test it! Instead of slaving say at major updates that may not even work, make constant changes.
Your app will never be a big hit on launch day. It just doesn’t happen. However, that doesn’t mean your app won’t be a hit. The killer app is born on the umpteenth version, not the first. The killer app will only explode after countless tests and experiments. Without strategic continuous integration development, your app will never explode. however, if you’re constantly checking in with customers, listening to what they have to say, and correcting your failures while they’re small, how can you possibly not explode?